Dungeon 1: The Forest Temple Task 1: Secure the Second Monkey
Chamber 1: Entrance

Once through the large cobweb, step into the dark, rocky corridor, and bring out your sword. A roving Keese flutters into your face; ZL target, then slash it out of the air. Move past a couple of small boulders on your left, and into the first large chamber.

You hear scratching and movement around you, coming from a Walltula on the right wall, scuttling around some vines. Ignore it for now, and pass between the two large totem poles. A Deku Baba springs from the ground. Slay it by cutting the stalk from the head, then check the area of vines to the side; there’s some climbing to do.

Treasure Chest: Before you continue, aim your Slingshot up the vine-covered wall, and shoot down two Walltulas crawling on it. After both explode, head into the vines and climb up them, then shift along the rock wall before dropping onto a small rock ledge.

There’s a chest here. Open it and claim the yellow Rupee (10) inside.

Treasure Chest #1
Yellow Rupee (10)

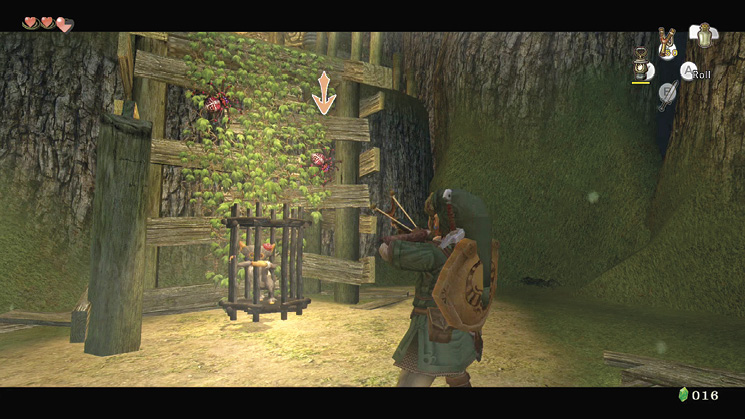
Drop off the platform and head north, until you spot a monkey in a cage below a vine wall. As you pass by the second set of totem poles, watch for the Bokoblin and a Deku Baba; slay both with a spin or your preferred slashing.

A spin attack makes short work of a wooden cage. Multiple sword swipes take longer.
Head to the monkey cage, and help the hairy simian out by demolishing her cage. Execute a quick spin attack to destroy the bars. The monkey scrambles up the vines, and beckons you onward. Midna tells you this is the monkey who stole your Lantern!
Step back from the vines, and (if you haven't already), aim your Slingshot at the two Walltulas, dropping both before you climb. If you don't, you'll be bitten and fall. Once at the top, the monkey urges you to open the round dungeon door. Oblige her.
Missing Links
1. Totem Pole Roll

Roll into each of the four totem poles in chamber 1, and they will shake. This dislodges pots on top of two of them. Each pot contains a blue Rupee (5).
|
Position your roll properly: if you roll toward the chamber wall, the pot falls and smashes on the wall, and the Rupee may be inaccessible. The pot should topple into the flat floor, away from the sides. |
2. Dungeon Grass Slashing

As usual, there are goodies in the grass: the left-side clump holds a Rupee, and the grass in the upper floor near the dungeon door yields a Heart and two Rupees.
3. Out-of-Reach Pottery

If you're checking this chamber carefully, you'll see a group of pots up on a high ledge. They all hold blue and yellow Rupees, but you can't get them yet! Return here later.
4. Within-Reach Pottery

Clay pots are atop the vine wall near the dungeon door; head right before you exit, and smash a couple for a Heart and a Rupee.
Chamber 2: Crossroads Hub

Head down the rickety steps and reconnoiter this room. It has three exits (north, east, and west) not including the one you came in from. Amid the grass on the lower ground area is a Deku Baba waiting to be ripped apart; he's on the left in the grass.
Skulltula
With a fearsome countenance and skull-shaped thorax (which is only for show) the Skulltula looks imposing. But it has a feeble nature, and it’s an easy and satisfying kill. If you try attacking head-on though, those spindly legs block your strikes. Instead, use the ZL trigger to block the leg attacks while you move to either side. Strike with a combo of slashes until the beast collapses. It isn’t dead yet, so finish it with a leaping strike you learned from the White Wolf. Press the A button when prompted to complete combat. 
The fearsome Skulltula is a scuttling fiend with angry mandibles, but it has a softer side too (and that’s where you should stick your sword). 
|

Move up to the steps where you fought the Skulltula, and survey the scenery. The two doors on each side of you require a jump that's too far to currently attempt. The way lies forward, but there's a sizable gap to overcome. First, check down below; there's an odd creature in the right corner.
Bombling
This odd creature is a Bombling, a stationary spider standing straight up on its legs, over a hole. Move forward and slash it once or twice. It collapses and flashes red. Seven seconds later, it explodes with a force that can damage you. After that, another Bombling appears from the hole on which the first was standing. Replacement Bomblings continue to appear. If you’re slaying Bomblings, strike them, and move on. You can also near them, and back away slowly, and they scuttle toward you a few feet before returning to their hole. Bomblings are more useful than a menace, as they appear near an impassible rock or foe that requires an explosive solution. In this instance, pick up the flashing Bombling and place it in front of a large boulder. Move back! 
Creepy, crawly, and explosive: the worst kind of spider is the most helpful, as long as you’re quick when you’re carrying it! 
|
Treasure Chest: The explosion you caused by placing the Bombling in front of the boulder reveals a small alcove under the upper north exit area. Drop and open the chest; there is a red Rupee (20) inside. Return to the central platform.

Treasure Chest #2
Red Rupee (20)
 Red Rupee
You got a Red Rupee (20)!

Optionally look up at the suspended chest (you need other means to retrieve the item inside), then figure out how to advance into the next dungeon chamber. Achieve this by retrieving your Lantern, and moving to each of the four torch stands. Light two stands and you can summon Midna. She convinces you to light the place up. After the fourth torch stand is burning, a set of heavy wooden steps appears!

|
These heavy wooden steps prevent you from opening the alcove blocked by the boulder below. Use the Gale Boomerang (which you’ll find later) to snuff out the torches. The steps recede, allowing you access to the boulder, if you didn’t explode it already. |
Run up the steps toward the northern dungeon door. Before you exit however, inspect the large chest to your right: it holds an incredibly useful piece of parchment; the Dungeon Map. Now you know how many floors the Forest Temple is, and which rooms you've explored. Head through the door the monkey is near.


 Dungeon Map
You got the Dungeon Map!
Using the Dungeon MapTap the Map button on the Wii U GamePad menu screen to view the map and Right on the Directional Pad to toggle the minimap on and off. You’ve visited green rooms. The yellow arrow shows your current location. Tilt the analog stick forward and X to change floors. The red arrow shows where you entered the current room. Combine this with the Compass to reveal the location of all the chests and the dungeon boss (shown by a skull icon). 
|
Missing Links

1. Dungeon Grass Slashing
This chamber is also filled with grass, which yields a Rupee piece or Heart refill for each large clump. Locate them before you face the Skulltula. There are more near the Bombling, and on one side of the northern exit.

2. Hanging Around: Cobweb Pottery
Hanging above the central platform are three pots and a treasure chest—and all are out of reach. Bring out the Slingshot though, and you can smash the pots, retrieving a blue Rupee (5) from two of them. You cannot drop the chest yet.
Chamber 3: Wind Gorge

The next chamber is a large gorge complete with wooden platforms that turn when the wind blows through fans connected at each platform's top. Your new monkey friend races to a rope bridge and begins to cross, but stops short.

A huge white baboon, known as Ook, raises from the opposite ledge, and launches a large Gale Boomerang! This severs the bridge supports, and the structure comes crashing down. The monkey scampers back, while the bad baboon pats his buttocks with joy!

The monkey grabs onto the falling bridge's boards and returns to you. That baboon leaves the scene, and Midna appears. She advises you follow the monkey, who's telling you to head into the Crossroads Hub. Follow that advice and retrace your steps.
Chamber 2: First Return to Crossroads Hub

Follow that crazy monkey to the rope span on the chamber's east side, and watch as she leaps and hangs from the middle of it. Line yourself up behind her, then run off the wooden platform. You'll automatically jump, and she catches you.

Then it's a simple matter of letting go using the A button as you're swinging forward. Time this correctly, or you'll land short or end up back on the platform. Press the A button after Link swings upward.
You'll land on a small ledge. On the nearby wall is an area of vines you can climb; however they don't lead anywhere. Ignore the torches on either side of the door. Open the door, enter the Step-stones Cavern, and make a left.

|
Use the Clawshot on this vine wall to hook and propel yourself if you return to this dungeon later (once the dungeon is completed, the monkeys are gone) to collect any chests you missed the first time around. |
Chamber 4: Step-Stones Cavern

Draw your sword and head over to a Bombling. Slice it once, pick it up, then move and place it next to the rock wall behind it, to the north. Back away, and the boulders explode when the Bombling detonates, revealing a secret alcove!

A couple of the pots contain Rupees, but one is of particular interest. It is moving, and there’s a head popping out! Smash it, and this weird Cucco -like creature appears, but with a human head! This is Ooccoo, who’s lost in the dungeon, too!
Ooccoo
Although it’s difficult to tell, Ooccoo seems around 40 years old. She lived in a great city in the sky, but she fell to Hyrule after strange events befell her home. She is hoping to find something she lost. Although she’s short, with baleful eyes, she’s friendly and has a great gift for you. |
 Ooccoo
You met Ooccoo! If you call her in a dungeon, she will let you out and allow you to return when you want.
|
Ooccoo is an item whom you carry throughout each dungeon, after you find her. She leaves you when you finish a dungeon. However, she’s helpful in that she can teleport you out of a dungeon, then back in at the same place you left. Do this to visit a shop and purchase an item to complete part of a dungeon, or to halt your game. If you save without using Ooccoo, you begin your dungeon trek at the entrance after you reload (although all the dungeon’s doors and chests you unlocked are still open). |

Place Ooccoo in your inventory (drag it onto either Y, X or ZL on the Wii U GamePad menu screen) for easy access, then turn and follow the cavern tunnel around to a large Skulltula web blocking your path. Access your Lantern and wave it at the web to burn it, then continue into the cavern.
|
Although you should be stocked with Lantern fuel, each time you wave the Lantern, it uses up more energy that letting it burn. Wave your Lantern only to light webs or torches, or to clear the murky air! |

Slice and dice that Deku Baba, but don't use a jumping attack. Then collect those Slingshot nuts!

While the monkey cowers, inspect that patch of weeds, and slay the Deku Baba that appears from it. There's a dormant Deku Baba against the wall; burst open the head for a Rupee! After you're done, survey the room; there's a vine wall, and a bridge with gaps in it.
Take the bridge ahead and slightly to the left of you. Follow that monkey across (you don’t need to press a button to jump; Link automatically leaps). Stop at the doorway. It is unlocked, and you can continue, but it’s better to inspect this chamber first.


The monkey cowers in fright at the pygmy Skulltula hanging from the ceiling on a string of web. She's blocking your path to a locked door. You can draw your sword and attempt to attack, but you can't reach, and you're likely to end up in the water after a nasty nip! Instead, bring out your Slingshot and tag that pygmy Skulltula. She falls, then scuttles toward you…and off the ledge into the water! An excellent dispatch!

The monkey bounds across to the locked door on the chamber’s eastern side. Alas, you don’t have a key yet, so ignore her. Instead, cross the rope bridge to the right. This allows you to inspect the room’s southeast part.

Look closely, as you'll see you can reach this area via the vines (but the bridge is quicker). This area contains a locked gate with a massive chest behind it. There are four fan contraptions but none of it can move. You won't be raiding this yet!
|
Did you notice the “Z” on the floor, running between the fans? That’s a clue you need when you come back here…. |

Treasure Chest: Before you leave via the north wall's unlocked door, dive into the water and swim around, under the rope bridge, and toward the southeast area's watery part, left of the locked gate. Swim through a gap below a tree trunk, and go up a small dirt ramp. A hidden chest in here contains Hylian Letter Stamp A!

Treasure Chest #3
Hylian Letter Stamp A
You can use the vines to the small rope bridge's right to climb up, or the steps up from the shallow water near your Deku Baba fight. Exit this place via the door in the north wall. You'll appear in the Wind Gorge, but on the eastern side.

Missing Links

1. Lily Pad Larks
Swimming in this chamber nets you Rupees when you move through the middle of the lily pads dotted around, so check all of them! Climb out in the southeast corner after your swim.

2. Deflowered Deku Babas
The Deku Babas aren't hardy enough for this dungeon, and some have withered away. Pick up their heads to find nuts (for your Slingshot), Hearts, or Rupees.

3. A Vine Time
Use your Slingshot on the Walltula, then climb up on the vine wall, slowly moving to the small wooden ledge, then leaping to the locked gate. Why is this necessary?

4. Bridge Demolition
Because if you slash the rope supports on the bridge, it collapses, and the only way to the locked gate is via the vines! It isn’t wise to demolish the bridge if you want a quick exit.
Chamber 3: First Return To Wind Gorge

Away from the massive middle gap, the gorge’s eastern portion is safe. Wait for the wind to spin the rickety platform bridge to link both sides, then roll across. Stop at the other side, produce your Slingshot, and ZL target those pesky Keese as you did in the misty woods of Faron Province. Run to the door in the north wall, and open it.

|
Any Keese who are too far to auto-target with ZL can be aimed at manually. This is important because you must master this technique! You can move if you hold down the ZL button and use the X button! |
Chamber 5: Wind Bridge Crossroads

Treasure Chest: The door leads to a large airy chamber with a chest to your left. Open it; it contains a Small Key! You can use this to open the locked door in the Step-stones Cavern. You can’t progress farther, so head back the way you came, through the Wind Gorge.
Treasure Chest #4
Small Key
 Small Key
You got a Small Key! This opens a locked door, but only in this area.
|
Missing Links

1. Pot Smashing
Shatter the trio of pots opposite the chest as you enter this room! There’s a tiny amount of money to be found.

2. Bokoblin Bashing!
You can’t turn the bridge platform yet, but you can attack the two Bokoblins guarding it! Pull out your trusty Slingshot and hit one, then watch as it trots toward you and falls into the bottomless pit.
Chamber 3: Second Return To Wind Gorge
Head south, back to the eastern side of the Wind Gorge, and bring down the couple of Keese who have returned to bug you. Wait for the bridge platform to connect with the ground you’re on, then run and open the south door.

Chamber 4: First Return To Step-stones Cavern

Enter the Step-stones Cavern, and make an immediate left. If the Skulltula hasn’t been defeated, it needs a Slingshot and a dip in the water. Jump the gap automatically, then run up and unlock the door with the A button. Push the door open.
Chamber 6: Totem Pole Cage Room

Step into a large oval chamber where an imprisoned monkey sits in a cage atop a totem pole. Your first monkey friend leaps over and rocks the cage, but it won’t open. It’s time to help! Head around to the shaky bridge, ignoring the vines. When you cross the bridge, it collapses!

You can’t go back, so either drop, or follow the wooden path down past the tree roots, to the main grassy area. That eeping is getting louder, so head over to the totem pole and check it out. It’s too high to reach with your sword. You need a better plan.
Treasure Chest: First, however, inspect your surroundings. Check the area under the bridge, directly under the vine wall, right next to a post, for a chest that’s easy to miss. Open it and grab your cash prize!

Treasure Chest #5
Yellow Rupee (10)
It’s time to free the second monkey! After watching the first monkey roll into the totem pole, try this yourself. Attempt another afterward (do this quickly or the cage rocks, but doesn’t fall), and the cage comes crashing down! Your monkey collection is increasing.

Follow the clue the first monkey gave you and roll into that totem pole twice; it’s the only way to get out of here!

This monkey-freeing attracts the attention of two Bokoblins, who jump down. Assault them with a sword spin and hacking; wait for them to arrive and dispatch both with one spin. Follow the monkeys around and up the path.
Back at the small collapsed bridge, the monkeys swing from the rope above, creating a precarious path for you to swing across! Press the A button quickly when Link is swinging upward. Do this twice, then exit the chamber.

Missing Links

1. Mowing the Lawn
Cut the grass for Hearts and Rupees, and return here with the Gale Boomerang to rake up those patches of leaves.
TM & © 2016 Nintendo.